Vespa Scooter,
Favorite Item for Vintage Style Wedding Cake Topper

Why Vespa Scooter?
It's old! that's my first impression and one thing that came out of my mind when I was asked about figurine design that is suitable for vintage style wedding cake topper.
It's probably because this vehicle has been around for long time, since 1946.
This scooter was manufactured by Piaggio and branded as Vespa. It's so famous that people thought that the brand is the name of the vehicle.
By the way, it's back on trend now and functioning well in the countries like Indonesia, India, Thailand and Vietnam.
Tools & Materials:
- Air dry clay (store bought clay or home made clay). I use yellow, black, red and green clay for this project.
- Clay tools
- Glue
- Toothpick or meat skewer
Steps to make vespa scooter clay:

- Let's start with the wheel. Make 2 pieces of T shape clay for the rim. Roll the clay to a ball shape, flatten it and cut the sides with clay knife. Alternatively, just shape the T with your finger by pushing the clay to the center.
- Roll black clay to a sausage shape and wrap it around the the rim
- Add the wheel cover for front wheel.

- The scooter figurine will have 3 lights - 2 lights in front and 1 light at the back. Roll 6 ball shape in various size as shown in the above picture.
- For the stirring, roll your clay to pipe shape and bend it a little bit.
- As for the handle, roll the clay to cone shape and make a hollow with your clay tool. Insert the handle to the stirring stick.
- Add the biggest light shape at the middle of the stirring handle.
- For the body, roll the clay to a rectangular shape at about 10 centimeter length and 3 - 4 centimeter width. Make a curve shape at one end and cut the inverted V shape at the other end.
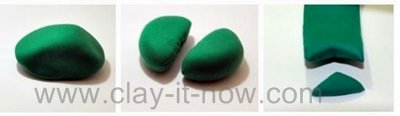
- Make a hump for the back of the body as shown in the first picture.
- And then roll a ball shape again, flatten it and cut it into two pieces.

- Bend the rectangular shape (body) to about 3 section lightly.
- Attach the body to the front wheel.
- Add the second size of light in between the front wheel and the front side of the body. Let it dry. You can use kitchen towel to support the body if your clay too soft to stand by itself.
- Next, attach the back wheel to the back of the body.
- Add the hump on top of the back wheel, back light and also the seat.
- Finally, if you want to use this as cake topper, insert tooth pick or meat skewer to both wheel and insert it to your cake.
An update for you:
We've added video tutorial for miniature vespa scooter at our You Tube channel. Some people says it's much easier design and to follow. Please click on the "like" button to let us know if it is a better version than the one in this page :)
Did you make the figurine following my tutorial? We would love to see your picture. Please send it to us using our submission form or you can post your picture to our Facebook page.
Have fun....
| Home | Ride-on | Bicycle Clay | My First Scooter |

Please LIKE, SHARE and SUBSCRIBE to support my channel.

Share your craft
Do you make your craft? Share it!