Cat on the Pillow Pencil Topper

Cat on the pillow pencil topper was created for kids and adults who love collecting specialty pencils.
Steps to make cat on the pillow pencil topper:
First of all, choose type of clay you want to use. Any clay including home-made clay would be okay.
I use home-made cold porcelain clay for the cat and soft magic clay from Crayola for the pillow.
If you don't have clay and want to buy one at your local craft store or online, I would suggest you to buy Crayola Magic Clay for soft feeling or Fimo Air which will hardened like porcelain.
Both are air dry (dry in room temperature without baking). As for Fimo Air clay, it can be hardened in microwave to speed up the drying process.
Don forget to knead the clay well until it's warm and soft before start with the modeling.


Alright! Let's start with our clay cat figurine project:
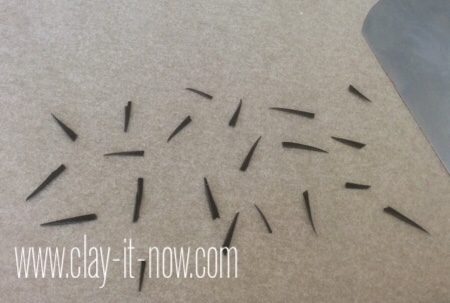 |
Step 1: Roll black clay to thin layer and cut to a slim and long triangular shape. | |
 |
Step 2: Make the two back legs to this shape and add the stripes when it's still wet. | |
 |
Step 3: Roll your clay to an oval shape for the body and add the stripes. | |
 |
Step 4: Make the tail and again add the stripes after that. | |
 |
Step 5: Roll the clay to a ball shape, press it lightly at the eyes area, make the hole for the mouth and add the stripes. | |
 |
Step 6: Add glue to the back legs and place the body on top of it. | |
 |
Step 7: Add glue to the back of the cat body and attach the tail. Tips: insert toothpick to the tail and the other end to the body. | |
 |
Step 8: Insert toothpick to the body let it dry, add glue, and then attach the head to the body. Add the tongue, nose and eyes, add the kind of expression on the cat face. | |
 |
Step 9: Roll 2 small balls in two different colors for ears. Flatten it with your rolling pin or thumb. Stack these 2 round clay. | |
 |
Step 10: Cut the four side until you have square shape and cut it again diagonally. You have 2 small triangle clay and smooth the edges. | |
 |
Step 11: Add glue to the base of the ears and attach it to the head. | |
 |
Step 12: Here is the ribbon to make the cat looks cute and pretty :) | |
 |
Step 13: Roll small ball and thin spaghetti shape of clay, flatten it and wrap the flatten spaghetti shape around the round shape. | |
 |
Step 14: Here is the cat's food container. | |
 |
Step 15: Our cat figurine is done! You may notice that I have change the stripe shape on the face from straight to curve lines. |
yayyy...! our cat on the pillow pencil topper is ready now.
Have fun!
Please share your picture if you make this craft following our tutorial

| Home | ^Top of the Page |

Please LIKE, SHARE and SUBSCRIBE to support my channel.

Share your craft
Do you make your craft? Share it!