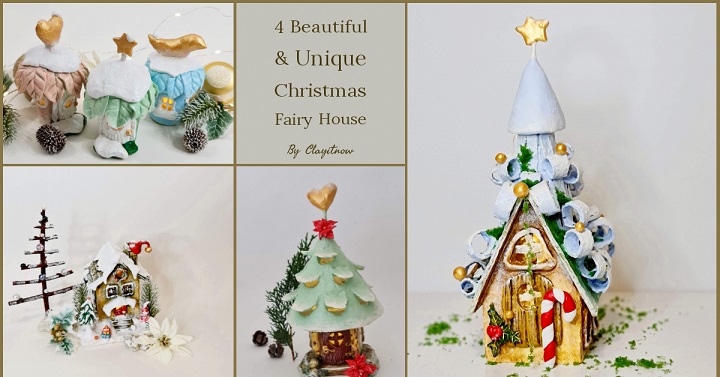
4 Christmas Fairy House Project Ideas - Unique and Beautiful for Christmas Decoration
Are you looking for Christmas Fairy House project ideas? You are in the right place.
Welcome to my world, where I've brought to life four enchanting Christmas houses straight from my creative mind. Yeah...They are ORIGINAL. These are not just average crafts – they're unique, beautiful, and exclusively showcased on my YouTube channel.
Each design is a whimsical tale come to life, inspired by fairy tales that spark my imagination.
Join me as we explore and relish the wonder of these one-of-a-kind Christmas fairy house project DIY crafts.
Enjoy....
Christmas Fairy House No.1
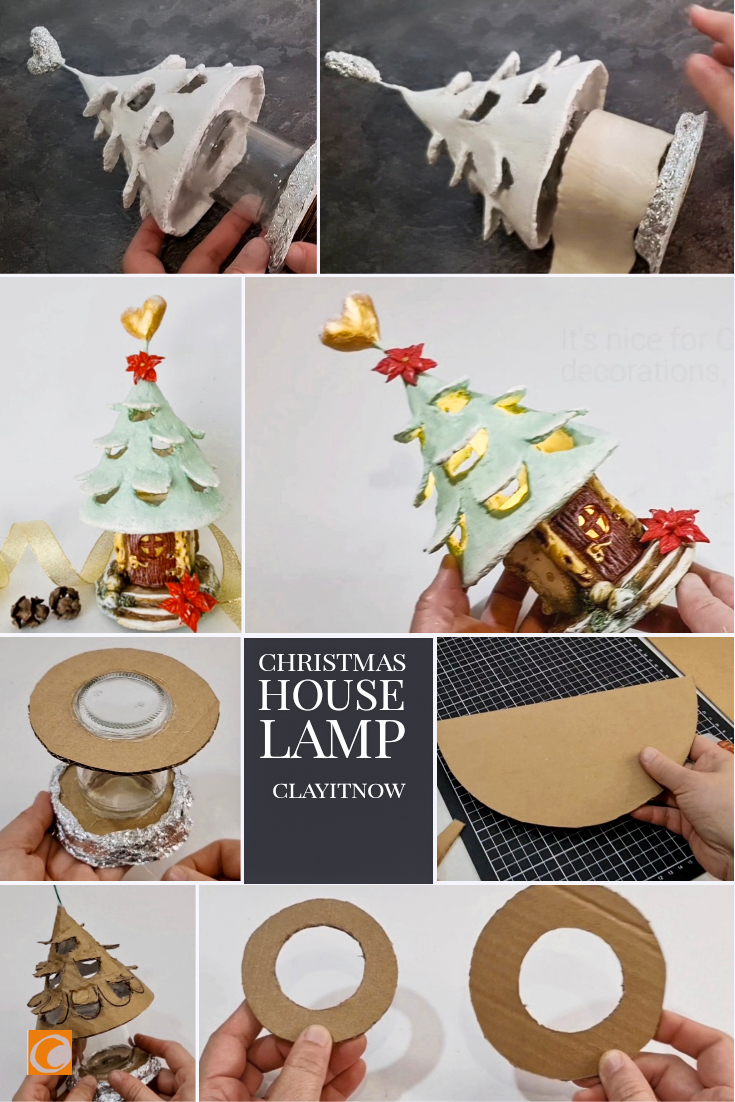
The fairy house builder was called by one excited fairy who has found a mushroom that looks like Christmas tree. She said, “I want to build a cozy country style house underneath that mushroom Christmas tree. I want poinsettia flowers as decoration because Christmas is around the corner. I want it to be bright where the lights shine out from the tree at night. The house would be a symbol of love. It's a season of love, let's spread the love around the house".
Alright! After scratching her head for few seconds the builder finally got an idea on how to construct the house as ordered by the fairy.
Materials:
- Glass jar (any size). I use small pesto jar for this craft project.
- Cardboard - adjust the size according to your jar size.
- Aluminum foil
- Hot glue and glue gun
- Acrylic paints: white, sap green, burnt umber, yellow ochre, brick red, scarlet, gold.
- Texture paste/ clay paste for the roof: I use brush to apply texture paste on cardboard roof. Apply thin layer and leave it to dry and then apply one or two more coats if needed.
Video Tutorial:
Christmas Fairy House No.2
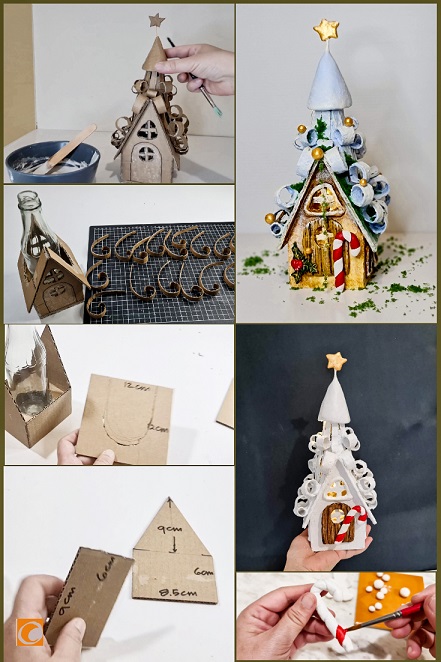
The fairy house builder was called by a rich fairy grandmother this time. She’s found super unique and beautiful tree with curly leaves or…ehm…barks.
The grandmother wants to build a simple and easy house but grandeur below the tree. She wants it spacious with open space plan for family gathering with her kids and grandkids during holiday seasons.
The fairy grandmother is stylish, modern and yet classy. She told the builder: “Look! I want a unique light blue Christmas tree like clouds in the sky. This would be the first ever Christmas tree in my fairy village with shape & color like that. I want bright shining little star on top of it and golden balls on the tree. The star will guide all little fairies at night when they are flying to my house. But, I want traditional Christmas ornaments as a sign that we are celebrating Christmas”.
“Alright! Alright! No worries. Your wishes granted. You’ve got it all”, said the builder after she’s completed her Christmas fairy house project.
The fairy grandmother was surprised with the end result. She said, “It’s stunning! You are not just building a house but beautiful fairy castle! I love it”.
That’s the fairy tale for Christmas house project number 2.
Materials:
- Glass bottle
- Cardboard
- Hot glue and glue gun
- Acrylic paints: white, sap green, burnt umber, yellow ochre, gold, ultramarine blue.
- Texture paste: I use home-made texture paste/ clay paste. Alternatively, you can use store bought spackling paste or joint compound. If you make your own clay paste, be flexible with the recipe. You can add more plaster or more flour to have the right consistency so, you can use brush to cover the cardboard
- Air dry clay for Christmas ornaments (any types/ brands - home made or store bought). In this project I use home-made clay with added tissue paper.
Hope you will not be confused on type of handmade paste or air dry clay I used for my DIY Christmas fairy house projects. If you prefer to buy joint compound or ready made air dry clay, check out my page.
Video Tutorial:
Christmas Fairy House No.3
The fairy house builder finally got a chance to fly to a fairy winter wonderland in Northern hemisphere. She was not flying with any Airlines Company but she was brought there by a powerful fairy.
The fairy visited the builder, wave her magic wand, and sprinkling the builder with her fairy dust. And, tadaaa….suddenly the builder could fly like one of the fairies.
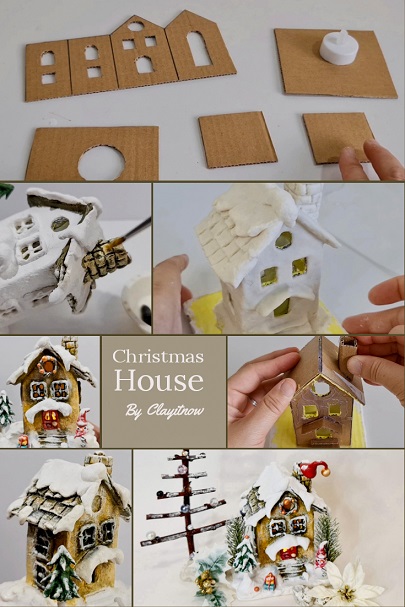
Christmas is around the corner, so, the fairy had asked the builder to build simple but sturdy Christmas fairy cottage in her tiny world. The snow has falling heavily there. It’s very serious folk. Any house that was built with weak structural design will collapse due to the snow load that building up on the roof.
The builder built a simple, strong, yet beautiful and elegant miniature house for her fairy client. The house decorated with Christmas decorations like snowman, baubles, miniature Christmas tree and gnome’s hat on the chimney made of clay.
The builder feels grateful to the fairy who has brought her to the fairy land. So, she built an extra tall bedazzled Christmas tree from the twigs she found at the forest nearby. She put in tiny crystal balls and pearls on the twigs.
Everyone is happy. The end. Ha..ha.. That’s my fairy tale for this Christmas fairy house project.
Materials:
- Cardboard
- Hot glue and glue gun
- Acrylic paints: white, sap green, yellow ochre, and paynes grey.
- Air dry clay (any types/ brands - home made or store bought). In this project I use home-made clay with added tissue paper.
Cardboard dimension for this Christmas House:
- 4.5cm x 8cm (17.7" x 3.14") 2 pieces for walls
- 2. 6cm x 8cm (1" x3.14") with roof height 3cm (1.18") - 2 pieces - for walls
- 3. 6cm x 5.5cm (1.4" x 2.16") - 2 pieces for roof.
- 4. 11cm x 10cm (1.6" x 3.9") - 2 pieces for base.
Video Tutorial:
Christmas Fairy House No.4
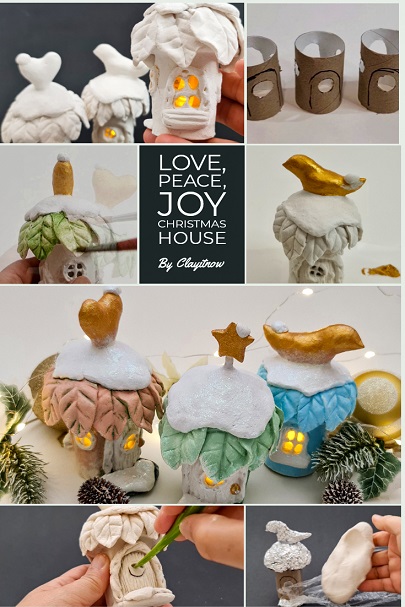
The fairy house builder is about to fly back to her home country in Southern hemisphere when the 3 kids of powerful fairy who brought the builder to the fairy winter wonderland asked her to build tiny fairy houses for them to play in the forest.
The builder knows that this 3 little fairies love to play hide and seek in the forest and sometimes fall asleep there under the leaves. But, these 3 little kids have not been out because of heavy snow. So, the builder built 3 cute miniature houses for these little fairies, whose name are Love, Joy and Peace with relaxing Christmas song accompanied her.
n each of mini houses she built, she put in the symbol of their names: heart shape for Love, star which symbolizing light, hope and happiness for Joy, and a bird for Peace.
Those tiny fairies are very happy with their miniature house.
And now, the builder flies back to down under, ready for summer in the land with beautiful beaches. Bye bye snow. That's the fairy tale for the fourth Christmas fairy house project.
Materials:
- Toilet paper roll tubes
- Cardboard
- Aluminium foil
- Wall filler/ spackling paste (optional)
- Hot glue and glue gun
- Acrylic paints: white, light blue, hookers green, yellow pink, gold
- Crystal glitter
- Air dry clay (any types/ brands - home made or store bought clay). In this project I use home-made clay with added tissue paper.
Video Tutorial:
MORE...
Christmas Fairy House Project Ideas
Now, here's the scoop: everyone and their fairy godmother wanted more, but our fairy builder is no business mogul. Nope, she's more of an artist with a sprinkle of fairy dust. Instead of swimming in contracts, she waits for those lightbulb moments in her teeny-tiny brain to create more Christmas fairy house projects.
Oh...wait! there's more! If you scroll down to the end of this page, you'll discover a whole bunch of other magical Christmas houses she's whipped up and generously shared with the world.
Now, it's your turn to join the fairy fun!
Which one of these whimsical wonders is your absolute favorite? Head on down to her YouTube channel (@clayitnow) and drop her a comment or a little fairy hug. Let her know you've visited her tiny house colony and become part of the enchanting crew! See you there...
New!!! Winter Fairy House
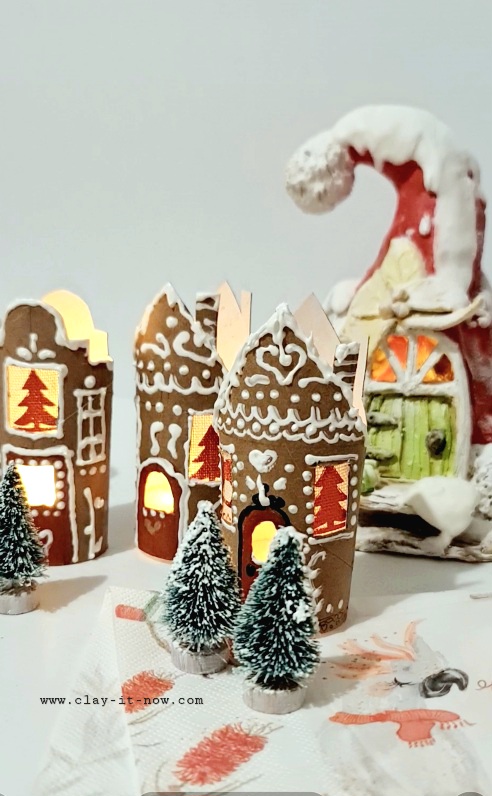
Mini Gingerbread House Lamp Craft Idea
Get ready to laugh your way into the holiday spirit with the quirkiest Christmas craft idea ever – Gingerbread House Lamps made from good ol' toilet paper roll tubes! Yup, you heard it right – we're turning trash into festive treasure faster than you can say "Ho, ho, ho!"
Now, hold your gingerbread cravings for a moment, because we're talking about a craft that's as far from yummy as it gets. Forget about the deliciousness of real gingerbread; we're on a mission to keep those little fingers busy creating holiday magic with the humblest of materials.
This project is so easy and fast, you'll be done before you can say "Yuck!" So, let's trade the cookie crumbs for crafting fun and light up your Christmas table with these budget-friendly gems.
Who knew toilet paper rolls could be so merry and bright? Get ready for a hilarious, heartwarming, and downright crafty Christmas adventure!
And here's the best part – you are not alone because I have complete step-by-step guide.
Watch the video for all the tips and tricks to turn those cardboard tubes into a hilarious, heartwarming, and downright Christmas fairy house project.
Santa Hat Christmas House
Christmas Santa Hat Fairy House
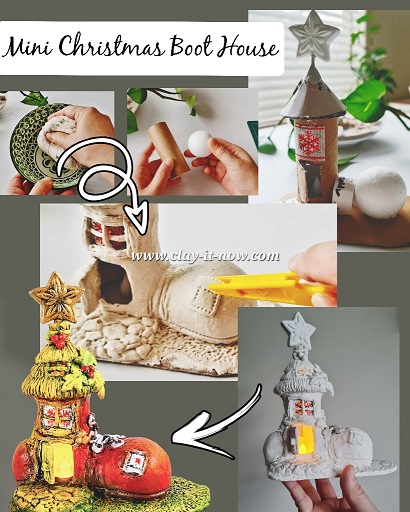
Christmas Boot House Lamp
Christmas Fairy House Using Jar, Cardboard, and Air Dry Clay DIY
Prepare to dive into the world of adorable crafts with my latest video tutorial! I'm spilling the beans on a super-simple air dry clay recipe that you can whip up at home using plaster of Paris, flour, and a splash of water.
Now, here's the magical part – ever wondered how to create the perfect snow scene for your whimsical projects? Well, buckle up, because I've got not one, but TWO incredibly easy ways to do it!
Just hit play on the video, and you'll see the snowy goodness unfold right before your eyes.
Click on the video tutorial below and let the crafting magic begin! Don't miss out – your adorable creation is just a click away!
Gingerbread House Using Cardboard & Liquid Clay for Icing
I really love making gingerbread houses, especially during the Christmas season. This time, I tried something new and made a gingerbread house that lasts forever.
I used cardboard and decorated it with air-dry clay. To make it look like real icing, I used liquid clay. It's super easy, and you can make a bunch of them in different styles to create your own gingerbread village.
If you watch my video, you might get some ideas and want to create your own unique style. Give it a try and have fun making your own everlasting gingerbread houses!
And, here is Christmas lantern to complete our Christmas decoration. I have inserted miniature house made of Styrofoam and air dry clay with Christmas theme.
Cute Christmas Mushroom Fairy House
Snowy Miniature Church Building
I thought you may need this kind of building for your fairy village or Christmas village.
DIY Miniature Christmas Village
Mushroom House Bauble Christmas Ornament
Christmas Berry Fairy House
Easy Christmas Fairy House Project
Snowy Christmas House DIY Lamps - NEW!!!
Did you enjoy these ideas? Craving more crafty inspiration? Well, here's a friendly tip: hit that SUBSCRIBE button on the Clayitnow YouTube Channel! Don't forget to turn on notifications to be the first to know when a new tutorial drops.
Thanks a bunch for stopping by and showing your support. Happy crafting!
| Home | Back to Top | 10 Creative Christmas House |
Please LIKE, SHARE and SUBSCRIBE to support my channel.
Share your craft
Do you make your craft? Share it!
