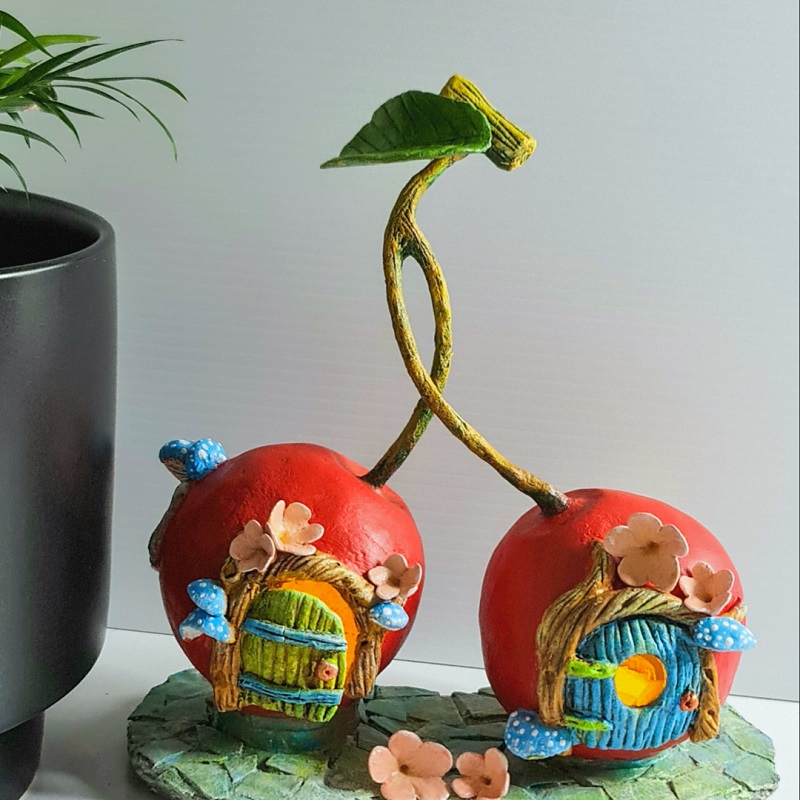
Mini Cherry Fairy House Lamps Using Homemade Paper Clay
This mini cherry fairy house lamps are a reminder of the beauty of spring and summer for me. I just don't want the cold of winter or autumn fade my memory of the cherry blossoms and the sweet taste of cherries. I'd like to freeze my memory and feel happy every time I look at these lovely houses.
I am wondering if the pretty fairies would love to stay inside this cherry houses :)
Are you ready to make this craft? Let's have fun.
Steps to make cherry fairy house:
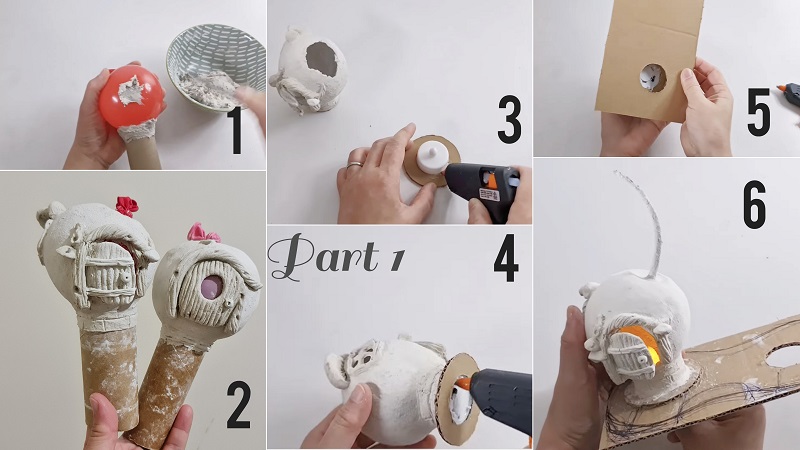
I split the step into 2 parts. The first part is on how to make the models/ armature and adding clay to get the right shape we want.
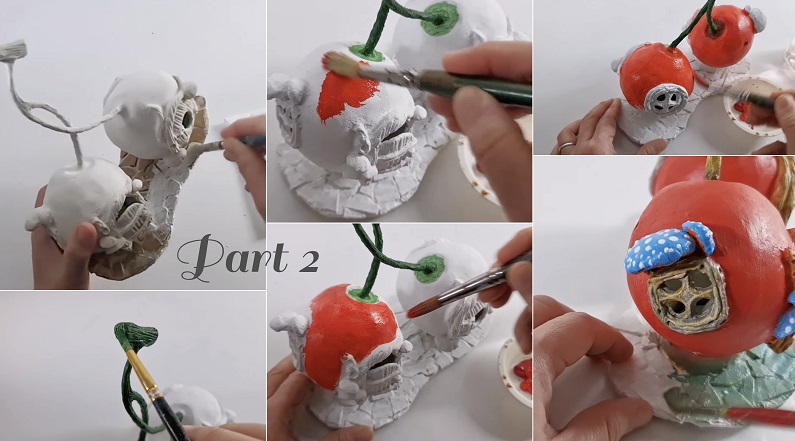
The second part is about finishing and paintings.
What materials we need to make this cherry fairy house? Don't worry! We don't need expensive materials. We'll use simple, affordable and easy to find materials such as balloons, toilet paper roll tube, double sided tapes, old magazine/ newspaper to make paper clay, flour, water, cardboard, LED tealight candle, a little wire, a little aluminum foil, and hot glue.
I use simple homemade paper clay recipe without glue for this project. Of course you can use any type of paper clay/ paper mache recipes you are familiar with or using store bought air dry clay.
You can see in step 1 (part 1 above), I have connected the balloon which is about 10cm or 4" in diameter to tissue paper roll tube with double tapes and cover the join with paper clay paste.
Clay paste? yes, I make soft paper clay so we can wrap the balloon easily and faster with spatula/ butter knife than harder clay.
You can stop for a while to wait for the clay to dry then continue wrapping the balloon with clay. This way, the balloon will be more stable and easier to handle.
Let the clay to dry slowly in room temperature to avoid crack. Sometimes when we use heat, the balloon may swell and push the clay out causing it to crack.
When the clay almost dry or hard enough when you touch it, add details like tiny mushrooms, window, and door.
Make a pair of cherries with similar shape and size. However, I know we can't exactly make 2 identical cherries because it is homemade. So, don't worry to much if 1 cherry smaller than the other one or doesn't have perfect cherry's shape :)
Next step is to add the Led tealight candle which is attached to the base of the house. I didn't cover the back of the light so, we can replace the battery when needed.
And then, I cut random size and shape of cardboard to make floor tiles.
In the second part of steps to make cherry fairy house, you'll see that I start the painting with white undercoat. This white underpainting will bring the color on top of it brighter.
Then I paint the branches with dark green. I add yellow ochre as highlight later on once the green dried.
I use scarlet as base color for the cherries, then adding rose madder, crimson and yellow here and there to give more depth and dimension on the cherries.
And, I use blue for most of the details including the mushrooms to compliment that bright red cherry color.
I use grey mix with blue and yellow for the floor tiles. That's it.
Do you like the idea? if you make this craft, you can submit and share the picture using the form below (share our craft) or using this link.
Btw, if you want to watch how I make this cherry fairy house lamps, you can visit my YouTube channel or click on below video. And, please don't forget to subscribe. Thanks
|Home| ^Back To Top | Fairy House Ideas| kids project ideas |
Please LIKE, SHARE and SUBSCRIBE to support my channel.
Share your craft
Do you make your craft? Share it!


