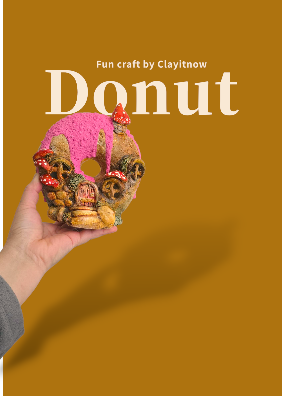
Donut Fairy House DIY Adventure
How to make Donut Fairy House DIY?
Hey, everyone! Grab a comfy seat and let's get our creative juices flowing. You know that feeling when you see something so cute and whimsical, you just HAVE to make it? That's exactly how I felt when I stumbled upon the idea of a donut fairy house. It’s like a sprinkle-covered dream come true, and I knew we had to make one together.
We'll be using some simple materials, and I'll share all the little tips and tricks I've learned along the way. Trust me, if I can do it, so can you! So, let’s dive into our sugary, magical world.
Donut Fairy House DIY - Part 1:
The secret to a perfect donut shape (AKA our homemade donut mold!)
Alright, first things first: we need a perfect donut shape. You might be thinking, "But where do I find a giant donut mold?" We're going to make one! And the best part? We're using stuff you probably already have lying around. It's all about being clever with what you've got.
First, grab a couple of pieces of cardboard. Think cereal boxes or Amazon delivery boxes. You’re going to cut out two identical big circles for the top and bottom of our donut. The size is totally up to you! Mine is about 5 inches in diameter, but you can go bigger or smaller. Just make sure you cut a hole in the center of both circles. This is for our donut's "hole," of course!
I found that a sturdy plastic tube from medicine bottle or even a kitchen towel tube works perfectly. Insert your cardboard circles with donut hole to this tube. I use this tube to hold the donut shape temporarily.
Next, we need to add some volume to our donut. This is where we get to be a little messy and creative. Gather up some old newspapers, used plastic bags, or any scrap paper you have. Start stuffing and crumpling it around the plastic tube, on top and bottom of the cardboard circles around the tube.. You're building up the donut's puffy shape, so don't be shy!
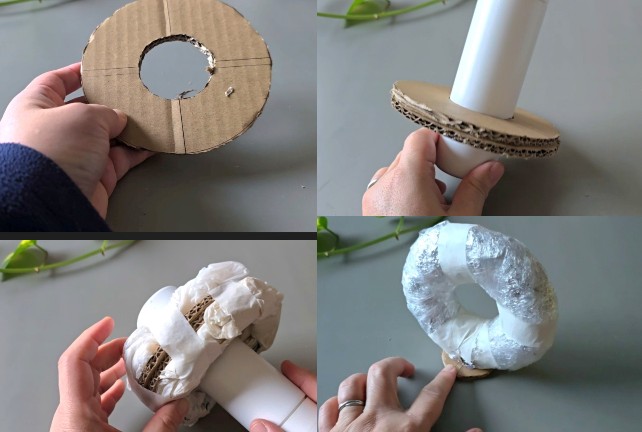
Once you have a good, plump shape, it's time to secure it. Grab your double-sided tape and some masking or packaging tape. Start wrapping the whole thing tightly with the tape, crisscrossing it to make sure everything is held in place. This is like putting a supportive jacket on our donut. You want it to be firm and not wobble.
Then, pull out the tube once you are happy with the shape.
Now for the next trick! Take some aluminum foil and wrap it all around the shape you just created. The foil adds another layer of firmness and helps smooth out any bumps from the crumpled paper.
This is key to getting a nice, even surface for our clay later on. It's like a foil blanket for our donut mold.
Finally, we need our donut to stand up on its own. Take a small, round piece of cardboard (about 3-4 inches in diameter) and tape it securely to the bottom center of your donut shape. This is our little stand. Now our donut can sit up straight like a proper little house!
And here’s the most important part of this whole step: take some cling wrap and carefully cover your entire donut mold. This is our secret weapon! When we put the clay on, the cling wrap will act as a barrier, making it super easy to detach our clay masterpiece from the mold once it's dry. Trust me, you'll thank me later for this tip!
So, to recap our mold-making mission:
- Cut two cardboard circles with holes.
- Insert a plastic tube.
- Crumple paper/plastic bags for volume.
- Secure with tape.
- Pull out the tube from donut hole.
- Wrap in foil for firmness.
- Add a cardboard stand/ base.
- CLING WRAP IT!
Ta-da! You've just built a custom donut mold. Now, let’s get our hands dirty with some clay!
Donut Fairy House DIY - Part 2:
The making of a super-fast, super-easy homemade clay
Okay, get ready to feel like a mad scientist! We're making our own clay, and it's surprisingly simple and effective. We're using a recipe that I've found works wonders for sculpting.
Here’s the simple recipe:
- 3 parts of plaster of Paris
- 1 part of plain flour
- Water
The ratio is the key, and it’s super easy to remember: 3-to-1.
In a bowl, mix your dry ingredients first. Let’s say you start with 3 cups of plaster of Paris, you’ll add 1 cup of plain flour. Give it a good whisk with a spoon or a whisk to combine them well.
Now, for the water. Add it slowly, a little bit at a time, and stir constantly. You're aiming for a consistency that's like a soft dough—not too watery, and not too thick. It should be easy to mold with your hands without being sticky.
PRO TIP: This clay dries FAST. Like, really fast. You'll literally feel it start to get firm in your hands. This is a good thing for quick crafting, but it also means you should only mix up a small batch at a time—just enough for what you're sculpting in the moment. Don't make a huge bowl of it and then go get a snack, or you'll come back to a rock! I usually just mix up a small handful's worth at a time. It keeps things fresh and fun.
If you need more drying time, Clayitnow has many other homemade clay recipes that suit your like newspaper clay, no-cook baking soda clay, etc.
Alright! Once you have your little lump of clay, you're ready for the sculpting.
Donut Fairy House DIY - Part 3:
Sculpting Our Sweet Fairy Abode
This is the most fun part! It’s time to cover the donut mold with our homemade clay. Get your donut mold ready, all wrapped in its cling wrap, and grab your first batch of fresh clay.
Start by rolling out a flat piece of clay and draping it over a section of the donut mold. You can work in two parts: the bottom half first, and then the top half.
So, let's start with the bottom. Press the clay onto the mold, smoothing it out with your fingers. Don't worry about it being absolutely perfect—a little texture gives it character! Work your way around until the whole bottom half is covered.
Once you've done that, you can take a little break while that part sets. This is a good time to mix up a new batch of clay.
Now, for the top part! Repeat the process, covering the upper half of the donut. Make sure the seams where the top and bottom meet are blended together.
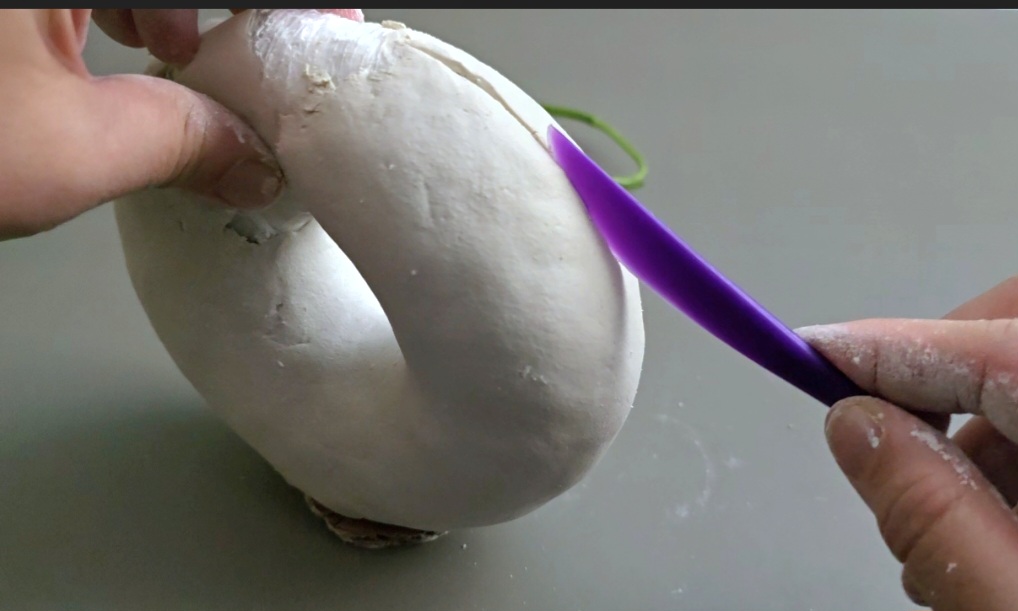
SUPER IMPORTANT STEP!
When you cover the bottom or top part, don't forget to cut a line all the way around the inside perimeter of the donut hole and another line around the outside perimeter. You're basically cutting a slice out of the donut "dough" itself. This creates a seam so that once the clay is dry, you can easily pop it off the mold in two separate pieces (left and right). Remember the cling wrap? This is why we did that! It makes this step so much easier.
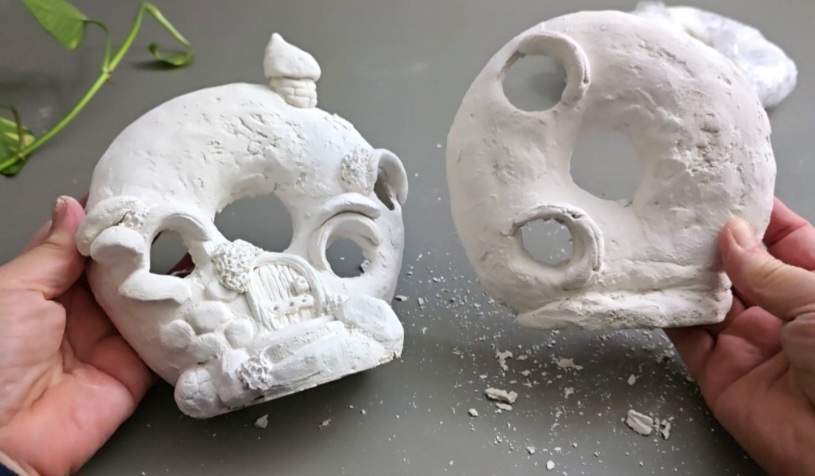
Now, for the exciting part: adding the details! This is where your imagination can run wild. Sculpt a little door, Cut out little windows, sculpt some adorable mushrooms, stones, grass patches, tiny flowers, or even a little ladder for your fairies to climb up to the front door.
Once you're happy with your design, set the whole thing aside to dry. It will be pretty quick!
Donut Fairy House DIY - Part 4:
Bringing
Our Fairy House to Life with Color!
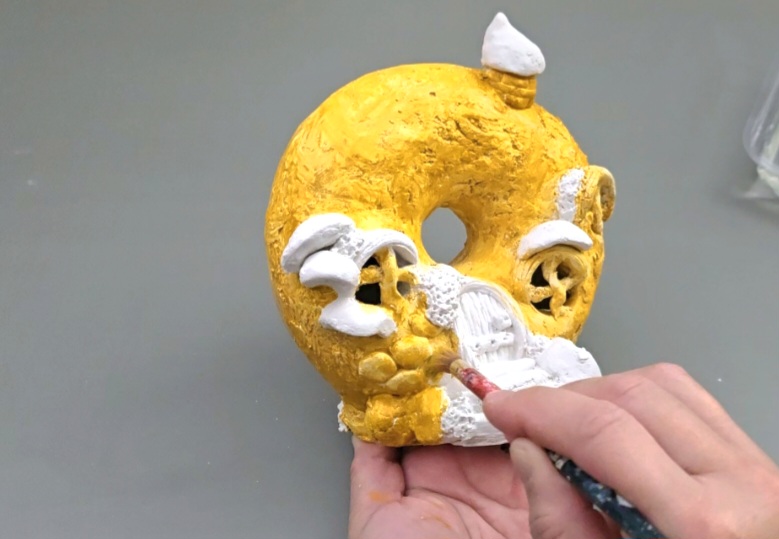
Our donut house is all sculpted and dry—it's time to add the yummy color! This is where we go from a plain piece of art to a magical, sprinkle-covered masterpiece.
Grab your acrylic paints! They work great for this and dry quickly.
We're going to start with a base coat that looks like a perfectly baked donut. The perfect color for this is yellow ochre. It's that beautiful, warm, slightly brownish-yellow that just screams "freshly baked."
Using a brush, paint the entire donut house with a coat of yellow ochre. You can go a little thicker in some spots to create a nice, textured look. This is our foundation, so take your time and make sure you get every nook and cranny.
You can choose the rest of the color but if you like my finish look, you can watch my coloring steps at Clayitnow YouTube Channel.
PINK PLASTER ICING
Now for the star of the show: the pink plaster icing! This is a messy, fun step, so maybe put down some newspaper. We're going to create a super cool, textured icing that looks like it has little bits of sugar in it.
In a small container, mix some pink acrylic paint with a bit of water to make it a bit runnier. Then, here's the trick: slowly add some plaster of Paris to the mix. Stir it gently. Don't worry about making it perfectly smooth! You actually want it to be a bit lumpy and grainy. This gives it that amazing, realistic sugar texture.
Once your "icing" is ready, just pour it right over the top of the donut. Let it drip and drizzle down the sides! You can use a popsicle stick or a spoon to guide it and make it flow exactly where you want it to go. Watch it drip down to the bottom. Ehm..it looks so good!
Let the icing dry completely. It will set up pretty quickly because of the plaster.
After the icing is dry, you can add the final details! Use tiny dots of bright paint or even glue on actual craft sprinkles.
A Sweet Home for a Sweet Fairy!
And there you have it! Your very own, completely homemade, totally charming donut fairy house DIY. Look at what you made! It's not just a craft; it's a piece of imagination brought to life.
Now, a quick but important note: since our house is made from cardboard and clay, it's a perfect fit for an indoor fairy garden or a special spot on your shelf. It's not designed for the great outdoors, so keep it inside where it can stay safe and sound!
And for a little extra magic, here's a super cool trick: grab a battery-operated LED tealight candle and place it inside from the donut base. When you turn it on at night, your little donut house will glow from within, turning it into the most whimsical, dreamy nightlight. It's the perfect finishing touch for any magical bedroom or cozy crafting nook.
I had so much fun creating with you today! If you're looking for more fun crafting ideas and easy-to-follow tutorials like this Donut Fairy House DIY, feel free to pop over to the Clayitnow YouTube channel. There's a whole world of creativity waiting for you there!
Happy crafting!
| Home | ^Top of Page | More Fairy House Ideas |
Please LIKE, SHARE and SUBSCRIBE to support my channel.
Share your craft
Do you make your craft? Share it!
