Fuchsia Flower Fairy House Tutorial

This fuchsia flower fairy house jar was colored with 2 method: painted after clay dry and mixing paints with wet clay.
This craft project probably is good for education and learning process about flower and basic clay shape.
Anyway, the fuchsia flower fairy house created purely based on my own imagination and interpretation. I didn't count the actual number or size of the real fuchsia's petal.
I like fuchsia because the flower bloom upside down and it looks like ballet dancer :).
The flower is beautiful and thought there could be fuchsia flower fairy living underneath the flower :)
So, let's build a house for those fairies.
How to make fuchsia flower fairy house?
STEP 1:

You need jar, cardboard or thick paper, scissor, tape, ruler, pen and small plate for template to make round shape.
Cut the cardboard with diameter about 17.5 inches or approx. 19 centimeter if you use mason jar.
I use small pesto jar and I make the round cardboard smaller - reduced about 1 centimeter.
Cut, a quarter of cardboard. Remove it and make a cone shape. Secure it with tapes.
STEP 2:

Next step, use aluminium foil to make the tail (I don't know what's the name) to hold the flower.
Secure the aluminium foil inside the top of the cone with hot glue and then add clay to secure it. When the clay dry, it will hold the aluminium foil tightly and securely.
STEP 3:

I mix purple acrylic color onto wet clay. I use homemade clay for this project. The clay will dry hard and sturdy but the color will not be as bright as when it is wet because I use flour base clay with additional tissue paper and tapioca starch.
You can also buy any type of air dry clay, whichever you prefer - please check my page, what clay to buy before buying any of them.
Once you have purple clay, cover the bottom of conical shape roof around the lid and then top of cone.
STEP 4:

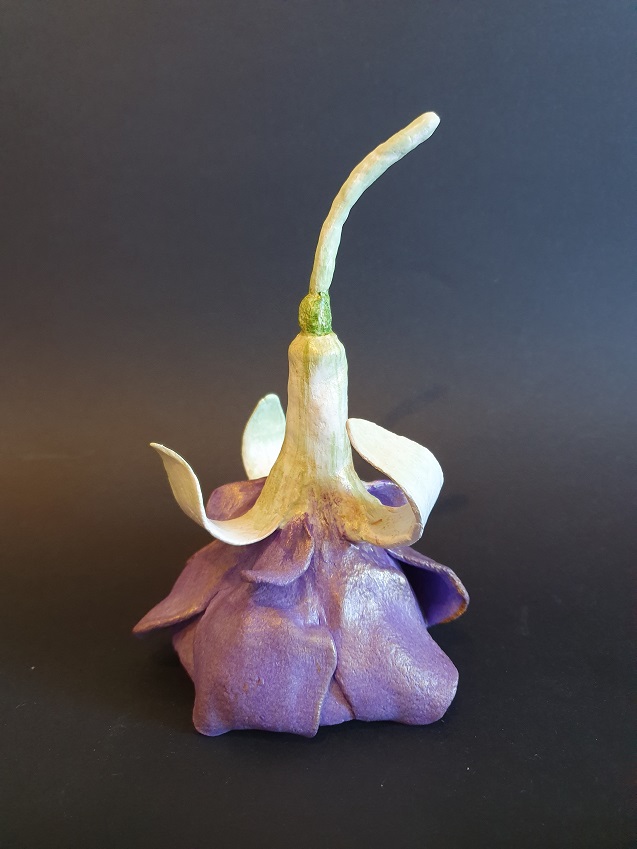
Steps 4 is about making fuchsia flower's petal, sepal and tube on top of conical roof.
For the first 3 petals, make about 1 inch diameter of ball shape then change he shape to teardrop. Press this teardrop shape of your rolling pin, spread it evenly to make flat oval shape and then paste it on the cone shape roof. Add a little bit water if needed to stick the wet clay. Tips: use tissue paper as a backing to keep the petal in place.
Then make the second 3 more smaller petals and paste it in between the first 3 petals.
Finally, make 3 more small petals start with clay ball shape about 1 centimeter.
Then, use plain clay (without color) to make the sepal. Again, start with ball shape and make sharp end at left and right side, and make it flat on top of rolling pin. Leave it until dry. This way, you will have bending sepal.
Once the sepal dry, paint or seal it with white gesso universal primer.
When the petals have dried, make a tube shape on top of the petals with aluminium foil. Wrap this tube with clay and insert dried sepal to wet clay on the top one by one.
Use wet clay as a glue to secure dry sepal to the clay on the tube.
Then cover the rest of the tail will clay too. Leave it until it's dry.
STEP 5:

The next step to build our fuchsia flower fairy house is to decorate the jar or the house itself.
Firstly, mark the part that you want to be the entrance or front side where you will have fairy door.
Then, cover the whole jar with air dry clay. Make the opening like windows or small round shape where you want the light to shine through when you use this fairy house as a lamp or lantern. For small round hole you can use drinking straw.
When you have finished with all the wrapping and opening, stop here. Wait until your clay dry. How long the clay will dry? Honestly, it depends on your clay thickness and humidity level or weather in your place.
Once the clay dry, back to your jar and start adding other elements for your fairy house.
For me, I start making timber frame around the entrance of our fuchsia flower fairy house and then making budding fuchsia flower that was as if dropping from the roof to the open window.
For larger bud, make the basic round shape with aluminium foil and than wrap it with wet clay. By doing this, you will have lighter flower bud than using all clay.
And, stop here. Wait again until the timber frame and flower buds dry to move to the final step: painting.
STEP 6:
Since we use colored clay for roof and flower, just add a little bit of light green and red on the flower.
For the highlight, apply metallic gold finish lightly with dry brush.
Then, seal the flower with mod podge or varnish.
Since we use colored clay for roof and flower, just add a little bit of light green and red on the flower.
For the highlight, apply metallic gold finish lightly with dry brush.
Then, seal the flower with mod podge or varnish.
The main color for the jar is light green. Mix small dot of green acrylic paint with white to make light green. And add darker green and light red for flower buds and raw umber for shadow.
I also use diluted raw umber for timber frame around the entrance and for fairy door.
Basically that's all the steps to make fuchsia flower fairy house.
VIDEO TUTORIAL
Below is video tutorial covering all above steps to make fuchsia flower fairy house. Happy watching. Please LIKE, SHARE and SUBSCRIBE to my YouTube channel.
Thank you for your support.
| Home | ^Top | More Fairy House Ideas |

Please LIKE, SHARE and SUBSCRIBE to support my channel.

Share your craft
Do you make your craft? Share it!