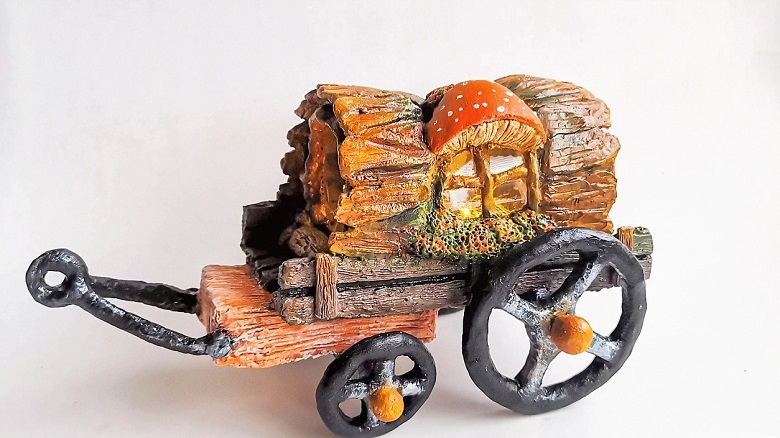
Cute Log Fairy Wagon DIY Idea
How to make log fairy wagon? if you've been searching for idea or tutorial to make fairy wagon, you'll have the answer here.
Yeah..I've done one, a cute one :) with waste materials and easy steps that I've been sharing it at Clayitnow's YouTube channel.
Have you watched my log fairy wagon video? No? Yes?
Well, if you have watched it but prefer to have steps by steps guide, this page might be useful for you.
Steps to make log fairy wagon:
Step 1: Make the body of the wagon
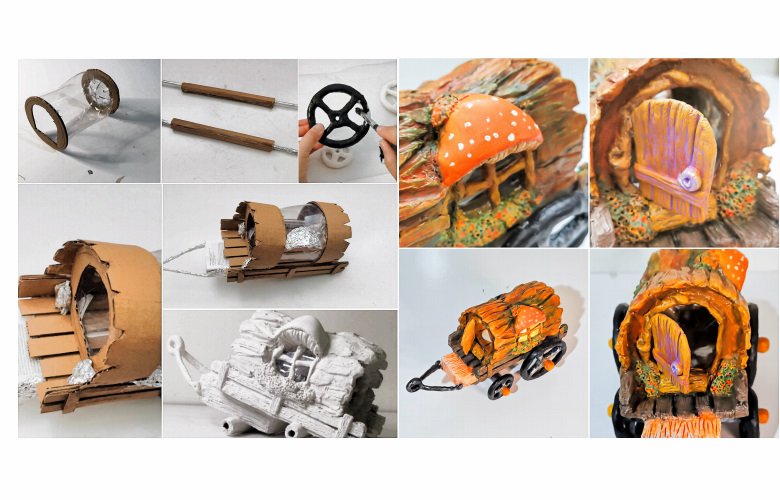
I use big plastic bottle for the wagon. Cut about 12cm/ 4.7" from the bottom part of the bottle.
Cut round cardboard following the bottle's diameter. 1 round cardboard with round window cut out and 1 round carboard with door shape cut out.
Paste the one with window cut out at the bottom of the bottle and the one with door cut out at the opening side of the bottle.
Step 2: Make the base of the wagon/ the cart
Cut rectangular shape cardboard, slightly longer than the plastic bottle with width about the diameter of the bottle. I didn't mention exact size here because you may have different shape of water bottle. Just cut the cardboard slightly bigger than your plastic bottle than fit it in and adjust the size.
Then, cut cardboard strips with various lengths. Uneven length of cardboard strips will make the card looks natural and rugged.
After that, cut 2 carboard strips to cover the side of the base (u shape). Add cardboard strips on these sides too. It will look like timber planks when we add texture paste later on.
Step 3: Attach the wagon to the cart and refine the shapes
Cut 2 cardboard pieces, paste 1 on top of the door area and one at the back. Then, cut small triangle shape at the outer edges. This will give us guideline when making tree bark texture.
Then, make half mushroom shape with aluminium foil. Paste it on the middle of the plastic bottle where we will make a side window below this mushroom. I will use aluminium foil too to cover any gaps between the log wagon and the cart.
By the way, I have small used face cream box with perfect dimension for the cart. So, I paste this box to the underside of the cart with hot glue. You can make the box with cardboard if you don't have used box with the right dimension for your log fairy wagon.
Step 4: Make the wheels with aluminium foil
Step 5: Make the tree bark texture for the log wagon and timber texture for the card.
I make my own clay texture paste with 3 basic ingredients: 3 part plaster of Paris, 1 part of plain flour and adjusted level of water.
I said adjusted because I would normally have more water to make soft/ watery paste like sour cream or peanut butter consistency and reduce the water to have hard paste until it looks like air dry clay where I can roll it with hand. Like you can see in the video when I make the fir tree bark texture.
Stop when you have finished covering the wagon with clay paste and wait until the paste dry.
I would normally leave it for about 24 hours (1 day) to make sure it is 100% dry. Be careful that wet paste will be soft and may crumble or collapse when you paint it.
Step 6: Painting
I paint this log fairy wagon before adding the wheels because it is easier for me. I add mod podge after painting to make sure that I will not ruin my painting when I continue with the next steps.
Step 7: Fixing the wheels
I set up and fix the wheels after the wagon painted and dry.
Step 8: Adding the door
Finally I paste the door that I make earlier with clay paste and painted with UHU glue.
That's it! the wagon is ready.
Oh yah..below is the video tutorial if you want to see more.
| Home | ^Top of Page | More Fairy House Ideas |
Please LIKE, SHARE and SUBSCRIBE to support my channel.
Share your craft
Do you make your craft? Share it!


