Mini owl planter from waste and paper clay: works for real plants

Let's make mini owl planter. It is small, original, handmade, beautiful, and most importantly can be used as planter for real plants.
Don't want to use it as planter? No problem at all. You can place it anywhere at home as decoration or keeping small jewelry or keys inside this owl.
We only need 4 items to make this cutie. The first one is used small plastic bottle. The second one is air dry clay. You can use any type of air dry clay but the best would be paper clay. Some modelling air dry clay may crack during drying time because it shrinks and pulling the clay that was wrapped around the cylindrical plastic bottle. You can check my article at "what clay to buy".
If you are the type of person who like DIY like myself, you may want to make the clay by yourself. If you do, how and what is the recipe?
For this simple craft project, I choose my super simple & cheap homemade paper clay without glue with newspaper pulps.
Are you ready now? Let's make our mini owl planter.
Steps to make mini owl planter:
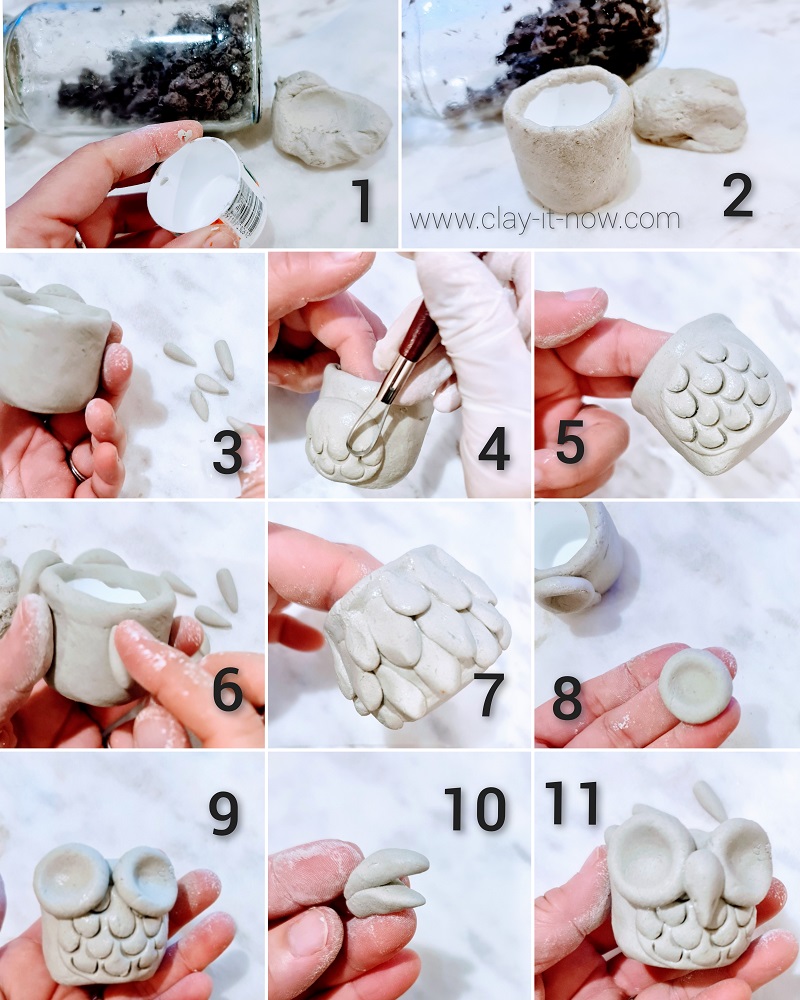
1. Choose your plastic bottle. Cut the top part so the opening same size as the bottle itself. And, prepare your choice of air dry clay.
2. Wrap the plastic bottle with clay. You can leave the project for few hours until the clay feels harder than wet clay. If not, it is okay to continue to the next step.
3. Make a ball shape clay, make it flat and paste it to the side of bottle you chose as the front part of the owl. I would normally use water to paste the clay piece (no glue).
4. I use double loop pottery tool to make the impression at the owl front body part.
5. You'll see the finish work of step 4 at image no. 5.
6. Make couple of small teardrop clay shapes. Paste it one by one at the back of the owl. This would be the feathers :)
7. The image showing the finish work of step 6.
8. Make 2 eye sockets. Start with ball shape, make it flat and indent the middle part with clay ball tool.
9. The eye ball socket will look like image no.9. Btw, fill the indent part with ball shape clay too and make a nice curvature for the owl's eyes.
10. Make the beak from teardrop clay shape, make a slit in the middle part with the top part slightly longer than the bottom part.
11. Paste the beak in between the eyes. Btw, fill the indent part of the eye socket with ball shape clay too when the socket dried and make a nice curvature for the owl's eyes.
Don't forget to make the wings :)
We are done with our mini owl planter after adding the wings.
Leave it and wait for the clay to dry which will take few days depending on the weather/ humidity level in your place. Putting the clay near the stove may help to speed up the drying time. But, be careful though. The clay tends to break/ crack when we force it to dry to fast.
Below is the image of mini owl planter before painting.
How do you want to paint the owl? what is your preferred color?
Ehm...I would prefer any color other than owl real color. Why? well, this owl shape is not a real owl. It is just an interpretation of cute owl shape. I make blue owl this time :)

Aha...here it is my final mini owl planter. What do you think?
If you make one, you can share your picture with me. Please use "share your craft" form (you can see the form at the bottom of this page too) to submit your pictures.
Btw, this project is not in my YouTube channel. If you want to watch my video tutorials for more ideas, please visit my channel and subscribe.

|Home | ^Back To Top | Fairy House Ideas| kids project ideas |

Please LIKE, SHARE and SUBSCRIBE to support my channel.

Share your craft
Do you make your craft? Share it!