Kitty Napkin Ring

Kitty napkin ring craft project is suitable for all level clay crafters.
Make a dozen or more of the rings and personalize it by adding other animal figurines according to the birth year of your family members and guests as shown in Chinese Zodiac.
It's a sweet surprise to your gathering like Christmas or other special occasions.
Isn't it cute?
So, what clay suitable for this craft?
|
|
Frankly speaking, cold porcelain clay or oven-baked polymer clay is good as it will dry hard. | |
 |
But, I like soft clay like Crayola Model Magic or Cloud clay because it's bouncy and still a little bit soft after it's dry. |
I've decided to use Crayola Model Magic for this craft :)
Steps to make kitty napkin ring:
 |
Step 1: Knead the clay and then make a ball shape. Then change it to rectangular by pressing the four side of the ball. | |
 |
Step 2: Press the two end of rectangular with your clay tool. | |
 |
Step 3: Cut the center of the press area with scissor or clay cutter. | |
 |
Step 4: This would be the kitty's 4 legs. | |
 |
Step 5: Shape and position the legs to your liking. | |
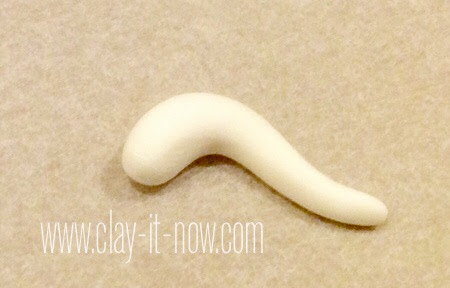 |
Step 6: Make the tail from elongated tear drop shape and bend it a little bit. | |
 |
Step 7: Attach the tail to the back of the body. | |
 |
Step 8: Roll a ball clay shape for head. Press the eyes area lightly with your thumb. | |
 |
Step 9: Make a small hole for the mouth and then insert small flatten ball clay in red color for the tongue. | |
 |
Step 10: Continue with the ears and nose. Use pink clay for the inside of the ears. You can see the detail to make the kitty's ear at cat on the pillow pencil topper. | |
 |
Step 11: Attach the head to the body. Add the yellow stripes or other colors and draw the eyes with black marker when the clay dry. | |
 |
Step 12: Use red clay for the ring. Make a long and flat clay about 3-4 inch. Embossed the clay to make it nicer with the embosser. | |
 |
As we plan to use it for Christmas, I added small green ball shape on the ring. That's it. We have cute napkin ring with kitten clay on it. |
Here are pictures of the kitty napkin ring from different angle.


Did you make this craft following our tutorial? Please share your picture and experience using the submission form below.
| Home | Clay Projects for Kids | Cherry Napkin Ring | Place Card Holder |

Please LIKE, SHARE and SUBSCRIBE to support my channel.

Share your craft
Do you make your craft? Share it!