Penguin Key Chain
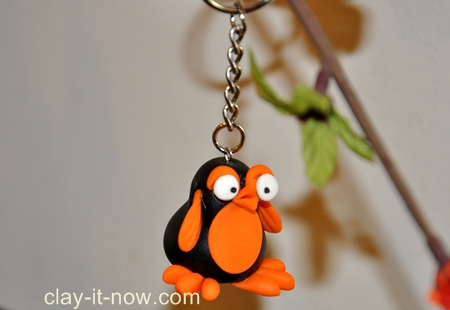
Make one of sought after souvenirs from Australia, Penguin Key Chain!
Materials & Tools
- Air dry clay in black, white and orange. You can make your own clay with my modeling clay recipes or buy the clay.
- White Glue.
- Black marker.
- Clay knife.
- Jewelry hook and key chain ring with jewelry tools.
Steps to make Penguin Key Chain:
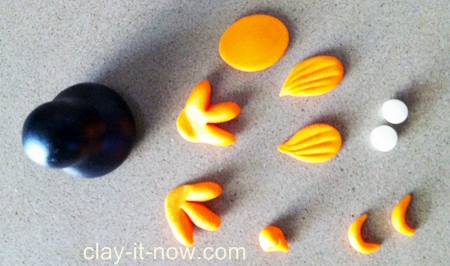
- First of all, roll black clay color to a bowling pin shape. Check my clay basic shapes page if you have not seen it.
- Leave it in open air until it's half dry.
- Take your orange clay. You can also use yellow color, white color or whatever color you like as long as it gives you a good contrast with the body.
- Roll the clay to two cone shapes, flatten it and cut to 3 equal sections with your clay knife for the feet. Press the base and slip it to the underneath of the penguin's body.
- Roll 2 small egg shapes, flatten it and make lines with your clay knife and sharpen the narrow edge. This is for the wing.
- Roll two small sausage shapes for the eye brows and bend them to half circle.
- For the beak, roll small pipe shape clay, sharpen both edge, flatten it and fold in the middle.
- For the tummy area, roll an egg shape and flatten it.
- Also, roll two small white ball shape for the eyes.
- Next, glue the components to the body and make it look like my finish work.
If your kids are the one making this penguin, they need your help now to insert jewelry hook to the top of the penguin's head.
When the clay dry completely, use your jewelry tool to open up the hook and attach your key chain.
This little penguin can also be used as pendant or other wearable items when you adjust the size of your figurine.
So, did you make this following our tutorial? Or, did you make other clay crafts that you have not seen it here?
We would love to hear from you.
Please upload your pictures and story using the submission form below. Alternatively, you might want share it at our Facebook page.
Have fun.....
You might also like:
Please LIKE, SHARE and SUBSCRIBE to support my channel.
Share your figurine
Do you make figurine following tutorial in this page?
Did you make your own? Did you collect figurines?
We want to see yours. Submit your picture and story to Clayitnow. It will become a new page with your name as an author.
Share your craft
Do you make your craft? Share it!
